Pelvic Floor Biofeedback
What is Pelvic Floor Biofeedback ?
The Evacuation Disorders Program teaches you the skills you need to make changes that will improve a common medical condition called pelvic floor dysfunction.
The goal of the Program is to help you improve control and coordination of your pelvic floor muscles and your ability to pass stool. Many people who complete the Program experience improvement in their pelvic floor function.
The Evacuation Disorders Program uses biofeedback therapy and relaxation techniques to teach you how to control your pelvic floor muscles. This is called pelvic floor retraining. The Program also helps you identify and change behaviors that may be contributing to pelvic floor dysfunction.
The Evacuation Disorders Program consists of an outpatient program and a home program.
The Home Program
After you complete the Outpatient Program in clinic, you will continue with a Home Program developed by your health care team. Because each person is different, the length of the Home Program will depend on your needs. The Home Program will help you to continue to improve and use the skills you learned at Midas Hospital.
Getting the most of out of the program
Treatment success depends on you. The best results happen when you are motivated, have an open attitude, regularly practice the skills you learn, and work to change habits that your health care team identifies as contributing to pelvic floor dysfunction.
A commitment to continuing treatment at home, as needed, also is important for success.
Using Biofeedback to Treat Pelvic Floor Dysfunction
Using Biofeedback to Treat Pelvic Floor Dysfunction Biofeedback therapy can help you learn to control your pelvic floor muscles and change behaviors that may be contributing to your symptoms.
When you are under stress or in pain, your body reacts in ways you don’t even notice.
If you are tense, your pelvic floor may be tense too.
Biofeedback therapy can help you:
- Identify your pelvic floor muscles.
- Isolate your pelvic floor muscles from other muscle groups in your body.
- Tighten your pelvic floor muscles (recognize what tension in your muscles feels like).
- Relax your pelvic floor muscles throughout the day.
- Relax your pelvic floor muscles to release stool and urine.
How does biofeedback work ?
Biofeedback gives you the power to use your mind to control your body.
Biofeedback helps you focus on making small changes in your body, such as relaxing certain muscles, to achieve the results you want.
While participating in the Evacuation Disorders Program, you will learn two types of biofeedback using:
- A hand-held biofeedback monitor with a rectal sensor that measures the muscle tension in your pelvic floor.
- A rectal balloon that helps you to retrain your pelvic floor muscles to make having bowel movements easier.
Biofeedback should not hurt. During biofeedback, you’ll practice different relaxation techniques. Your nurse will help you identify strategies to relax your pelvic floor muscles. Biofeedback can help you identify what relaxation feels like for you and what relaxation techniques work best for you.
As part of the Evacuation Disorders Program, you will learn to use the biofeedback equipment and techniques at home on your own.
Using Biofeedback Equipment
Biofeedback using a rectal sensor
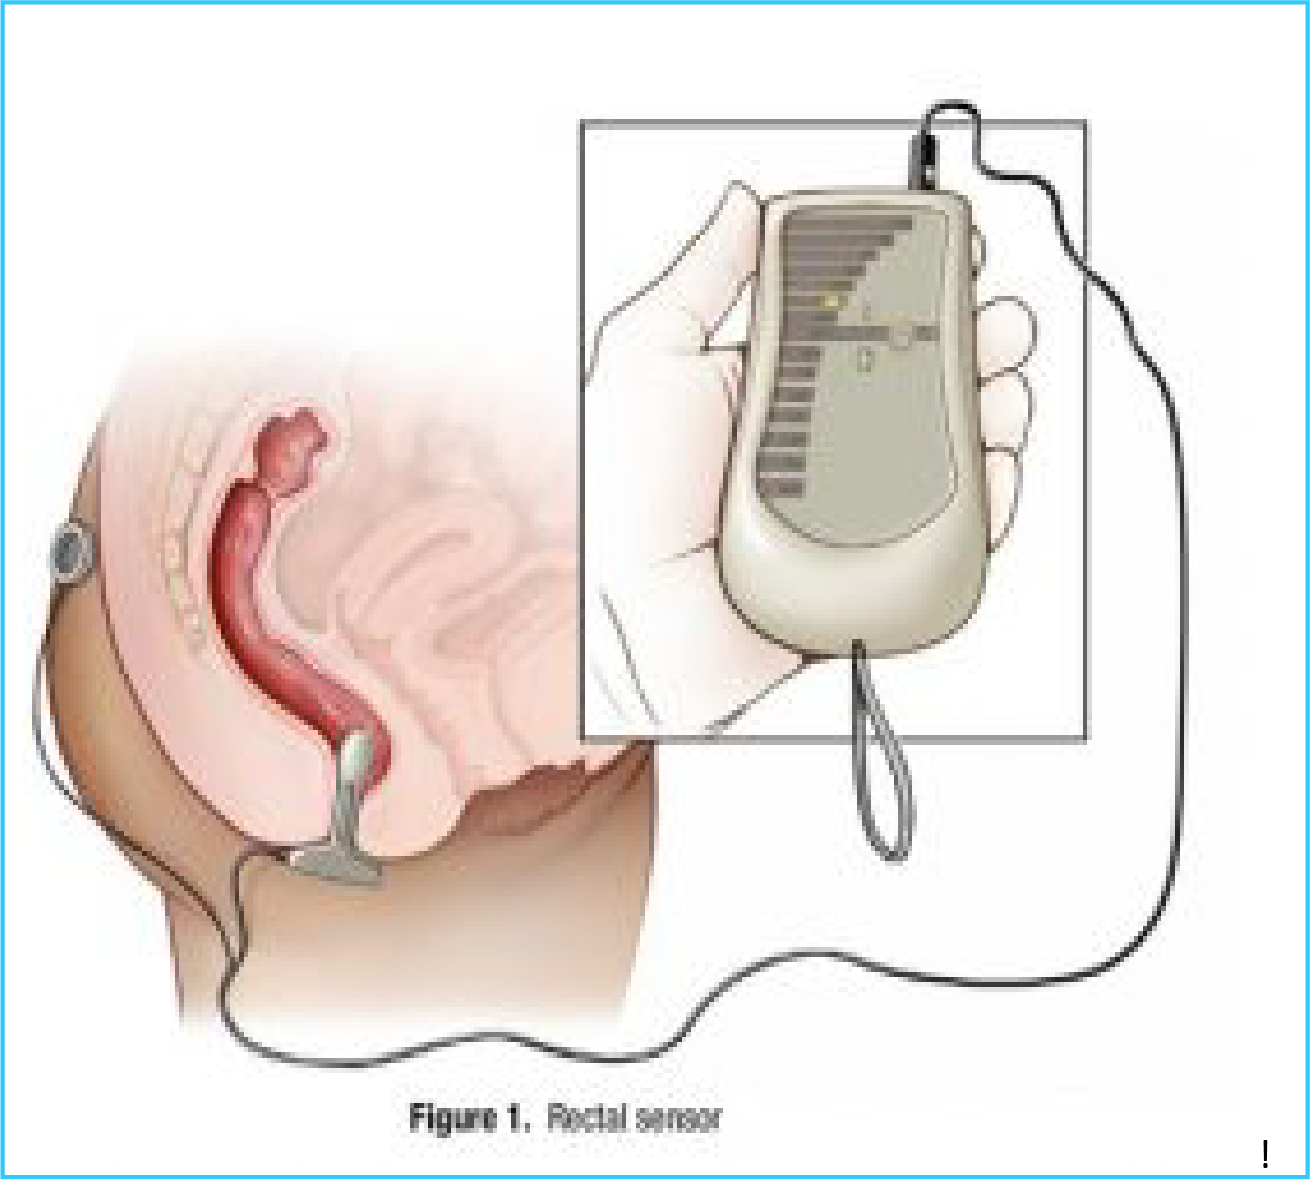
You will use a rectal sensor connected to a hand-held biofeedback display to measure the tension in your pelvic floor muscles (Figure 1).
This type of biofeedback uses electromyography (EMG) to measure muscle tension. When your muscles tense up, they produce electricity. The sensor measures that electricity. The sensor will not shock you.
The hand-held monitor shows you how tense or relaxed you are by measuring “microvolts” of electricity. Your monitor may be different than the one shown in Figure 1, but the display will show you how tense or relaxed your muscles are.
Your nurse will assist you as you learn to set up and use the rectal sensor and monitor.
Your nurse will explain how to read the monitor as you tense and relax your pelvic floor muscles. Your nurse will help you identify the level of relaxation that you need to achieve.
Once you learn how it feels to relax your pelvic floor muscles, you will work to keep your muscles relaxed for longer periods.
Learning to relax your pelvic floor takes practice. The goal is to help you get to the point where you can control your pelvic floor muscles and relax them in a variety of positions. You will practice biofeedback in many positions including sitting, lying down, and standing.
Practice, Practice, Practice
Practicing throughout the day is the best way to turn what you learn from biofeedback into your new normal.
Be patient, it can take a while to learn how to relax.
With practice, the goal is that you will be able to identify when your pelvic floor muscles are relaxed without the biofeedback display. This will get easier as you learn to identify what it feels like to relax your pelvic floor muscles.
You may need to continue using biofeedback equipment until you are able to achieve and maintain pelvic floor relaxation. Even after you become very good at relaxing, you may need to use the biofeedback equipment every so often if you feel yourself tensing up and are unable to relax.
Instructions for using the rectal sensor and hand-held monitor :
- Lubricate the sensor over the silver bars and at the tip with a small amount of water-soluble lubricant (for example, K-Y Jelly™ or Surgilube™). Do not use oil-based or petroleum-based lubricant (for example, Vaseline™) as it will prevent the sensor from working correctly. Do not use too much lubricant.
- Take a minute to relax. Insert the rectal sensor as instructed by your nurse. The T-bar should rest against your skin (see Figure 1).
- Snap the electrode patch onto the ground lead and stick it to your hip, buttock, or lower abdomen.
The rectal sensor should not cause discomfort or pain.
You may feel the sensor after it is inserted, but the more you relax, the less you will feel it.
Tell your nurse if you experience pain upon insertion of the sensor or after it is in place. There are options available. - Plug the sensor cord into the sensor jack on the top of the hand-held monitor, lining up the white arrow on the sensor with the “notch” on the machine. Do not force the cord into the jack.
- Set the tone switch on the top of the monitor to CON (continuous).
- Set the scale switch on the top of the monitor to X1.
- Turn the power on using the ON/VOL dial located on the left side of the monitor. Roll it UP/clockwise. You can use the audio feedback if you find it helpful.
- To begin your session, set the threshold dial on the right side of the unit.
- Practice the skills as instructed by your nurse. Your session should last about 20 to 30 minutes.
- Turn off monitor. Unplug your sensor. Wash in warm, soapy water and dry well.
As you think about relaxing your pelvic floor muscles, consider the following:
- Does general relaxation help you relax your pelvic floor?
- Does pelvic floor relaxation feel different as you change positions?
- Is it easier to relax some of the muscles more than others?
In order to relax my pelvic floor muscles, I need to:
When my pelvic floor muscles are relaxed, I feel:
If you have problems with the biofeedback equipment
If you are experiencing odd or unexpected feedback, try these steps first:
- Make sure the cord connecting the sensor to the monitor is in place.
- Make sure the electrode patch is sticking to your skin. Replace patch if it is no longer sticky.
- Make sure the sensor is inserted into your rectum with the T-bar flush against your skin (see Figure 1).
- Check the battery:
–– If the lights on the monitor are flickering, spiking up and down, or are dim or out, the battery is probably low.
–– Replace the battery to see if that solves the problem.
- Make sure the biofeedback scale on the hand-held monitor is set to X1.
- Turn monitor off and on again.
Trouble-shooting problems with rectal sensor biofeedback Problem Possible Solutions Odd or erratic readings
- Check that the cord is attached snugly with white arrow at the notch.
- Replace electrode patch if no longer sticking to skin.
- Recent bowel movement, gas, or muscle spasms may cause jumpy muscles.
- Sensor may be positioned incorrectly. Reinsert.
- Tighten and relax your pelvic floor. If the reading does not accurately reflect the muscle activity, first make sure the sensor is inserted correctly and that it is in far enough. If that does not fix the problem, replace the battery. Lights zip to top and back or
- Battery may be low. Replace battery. flicker rapidly Lights look dim (although may
- Battery may be low. Replace battery. work for a while on dim) Lights do not come on at all
- Battery may be loose in the compartment. Check silver clips.
- Battery may be dead. Replace.
- Battery may be inserted wrong (+/-). Reverse battery. Really good readings when
- You may not have the unit switched to X1 you don’t expect it
- You may not have the threshold dial set correctly. Other
- Use of Vaseline or any other greasy lubricant may cause poor readings (due to non-conduction). Always use K-Y Jelly™ or equivalent generic.
- You may have a problem with the sensor. The wires in the cable or at the plug end may be damaged. Do not wrap the cord tightly or force the sensor cord into the unit.
If you check all of these things and there is no improvement, a wire may be broken.
Contact the provider of your equipment for assistance.
Balloon biofeedback
Balloon biofeedback uses a rectal balloon filled with a small amount of water to give the sensation of stool in the rectum.
Balloon biofeedback can help to:
- Identify what it feels like to have the rectal urge that commonly happens before a bowel movement.
- Learn to relax your pelvic floor muscles to more easily pass stool.
During balloon biofeedback, you will insert a small balloon into your rectum. The balloon is attached to a plastic tube that has a valve on it. This allows you to use a syringe to fill the balloon with water after it is in your rectum.
Balloon biofeedback should not hurt. Let your nurse know if you have any discomfort during balloon biofeedback.
Your nurse will show you how to make the balloon setup, and there are detailed instructions on pages 10-15 of this booklet.
Using the balloon setup
Using the rectal balloon equipment imitates having stool in the rectum.
Different exercises can help you:
- Learn what sensations you need to pay attention to and indicate you are ready to pass stool or have completed passing stool.
- Learn how to relax your pelvic floor with a rectal volume present.
- Learn the stages of pelvic floor release to allow the balloon and thus stool to pass.
- Learn to avoid habitual straining behaviours.
- Lessen involuntary tightening of the outlet muscles during release of the balloon/stool.
The goal of balloon biofeedback is to take the skills you learn and successfully apply them to real-life situations.
During the outpatient program, your nurse will work with you until you are comfortable using the balloon setup for biofeedback on your own. Follow these instructions.
- Open valve and empty any air out of the balloon.
- Lubricate the balloon with water-soluble lubricant (for example, K-Y Jelly™ or Surgilube™). Fold the balloon over the tip of the tubing.
- Relax. Insert the balloon into your rectum. Slowly advance the tubing so it sits comfortably in your lower rectum. With practice you will be able to feel when you pass through the muscles of the anal canal into the rectum. You will practice with your nurse so that you know what it feels like when the balloon is inserted correctly.
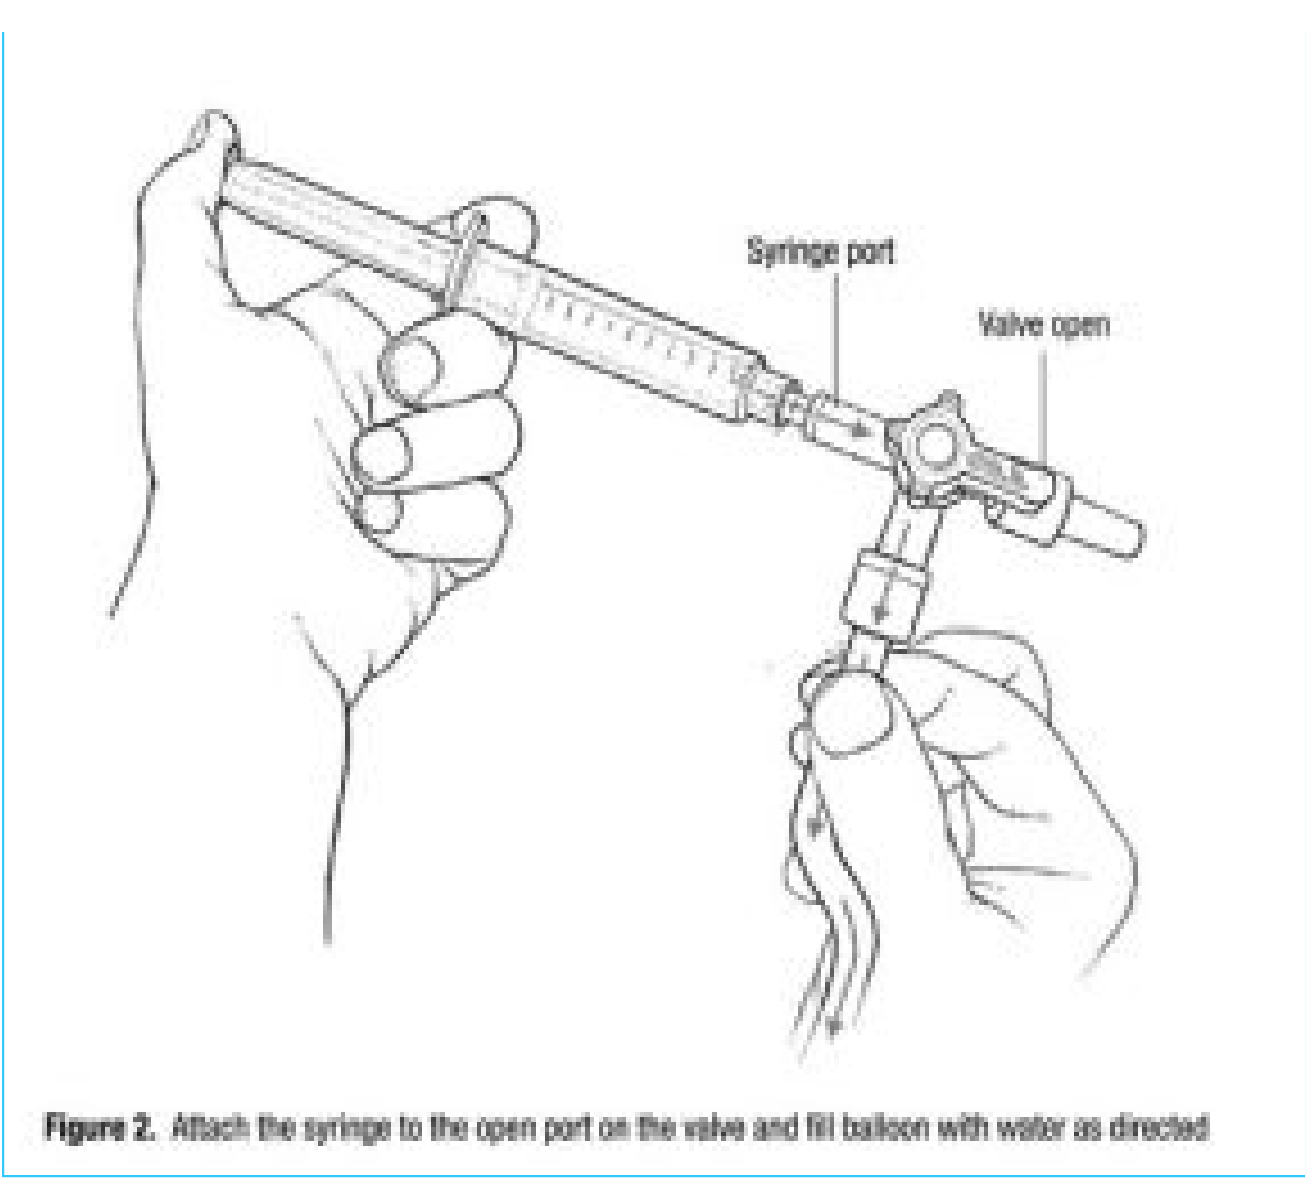
- Draw up about ____ cc of warm water with the syringe. Attach the syringe to the open port on the valve
- Slowly fill the balloon with water. As the balloon fills, you likely will feel the balloon expand in your rectum. (If the balloon falls out, it was not in far enough. If this happens, open the valve and let any water out. Start over.)
- Once the balloon is filled, close the valve so that the water stays in the balloon. Remove the syringe.
- Sit on the toilet. Gently pull the balloon down using the thread or tubing until you feel the balloon in your lower rectum.
- Use the feedback you get from the balloon setup to practice relaxing your pelvic floor and releasing the balloon. Practice as instructed by your nurse (use the box on page 10 to record your instructions).
- Practice biofeedback with the balloon setup for about 20 to 30 minutes. When you are done, wash the balloon with warm, soapy water and drain water from balloon.
- Store balloon setup with about 20 cc of air inside the balloon.
Instructions for pelvic floor relaxation and retraining using the balloon setup When using the rectal balloon setup, I should focus on My goal is to Making the balloon setup Gather the supplies that you need to make the balloon setup (Figure 3)
- A small balloon. Look for round balloons that measure 4 to 6 inches across when inflated (often sold as “small 4-inch balloons,” “mini balloons,” or “water balloons”). If you can find a small straight balloon that is only 4 to 6 inches long when inflated, that will work too.
- Dental floss (waxed or un-waxed) or heavy-duty thread (quilting thread).
- Foam medical tape or foam mounting tape. You can purchase tape that is ½ inch to ¾ inch wide, or you can cut wider tape so that it is ½ inch to ¾ inch wide.
- Tubing with on/off valve attached. (You will be provided with tubing. If you need new tubing, contact your health care provider.)
- Syringe.
If you have a latex allergy, discuss options with your nurse.

Directions
- Cut a piece of foam tape so it is about 1 inch long and ½ to ¾ inches wide.
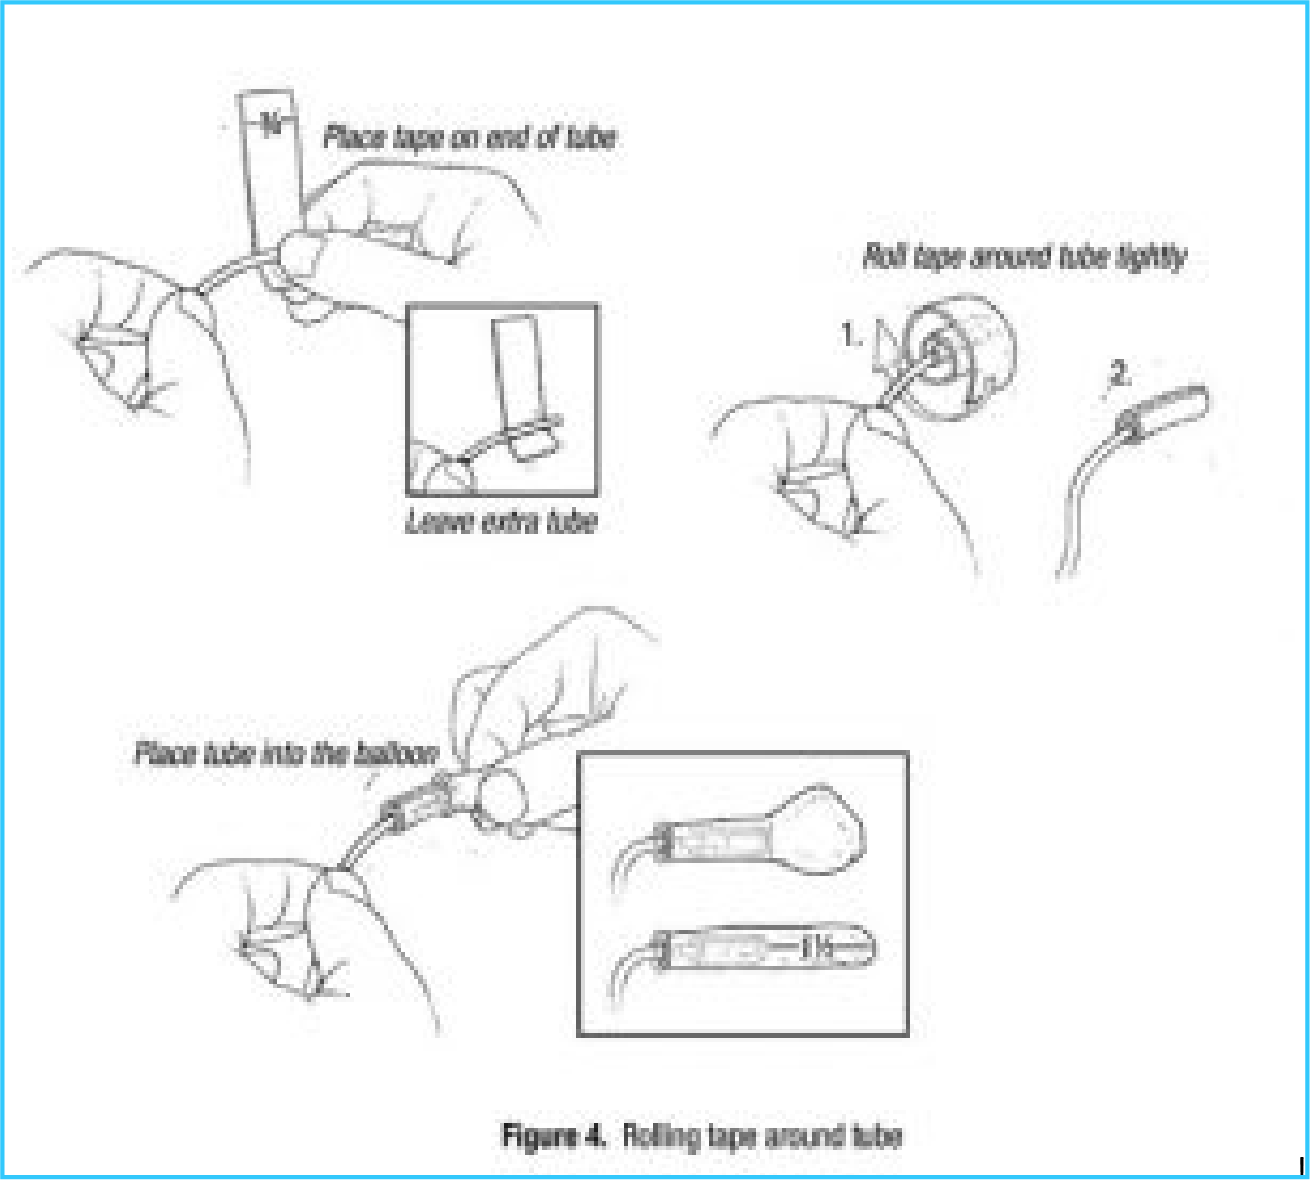
- Place the tape near the end of the tube as shown in Figure 4. Make sure you do not cover the end of the tube with the tape. Wrap tape tightly around the tube 1½ to 2 times. This forms the base for tying the balloon to the tube.
- Slide the balloon over the tape. The end of the tubing should be about where a round balloon begins to flare out or about 1½ inches from the end of a straight balloon (Figure 4).
- Cut about 2 feet of dental floss or heavy thread.
- Loosely tie the thread around the balloon where you have placed the foam tape (Figure 5a). Leave 2 long “tails” of thread.
- Slide the loose knot toward the opening of the balloon. Tighten so that the knot rests on top of the foam tape (Figure 5a).
- Wrap one of the tails around the balloon over the foam tape. Wrap it tightly enough so that it sinks into the foam tape, but not so tightly that it squeezes the tubing shut (Figure 5b). Wrap from the knot toward the opening of the balloon. Stop near the end of the foam tape.
- After nearing the end of the foam tape, reverse direction and continue to wrap the thread over the balloon (Figure 5c). You will wrap back toward the knot and the other tail. When the two threads meet, tie a secure knot using both ends
- Using the other tail, wrap in the opposite direction. When you near the end of the foam tape, reverse direction and wrap back toward the knot and the other tail. When the two threads meet, tie a secure knot using both ends
- Pull firmly on the balloon and tubing to be sure the balloon does not slide off.
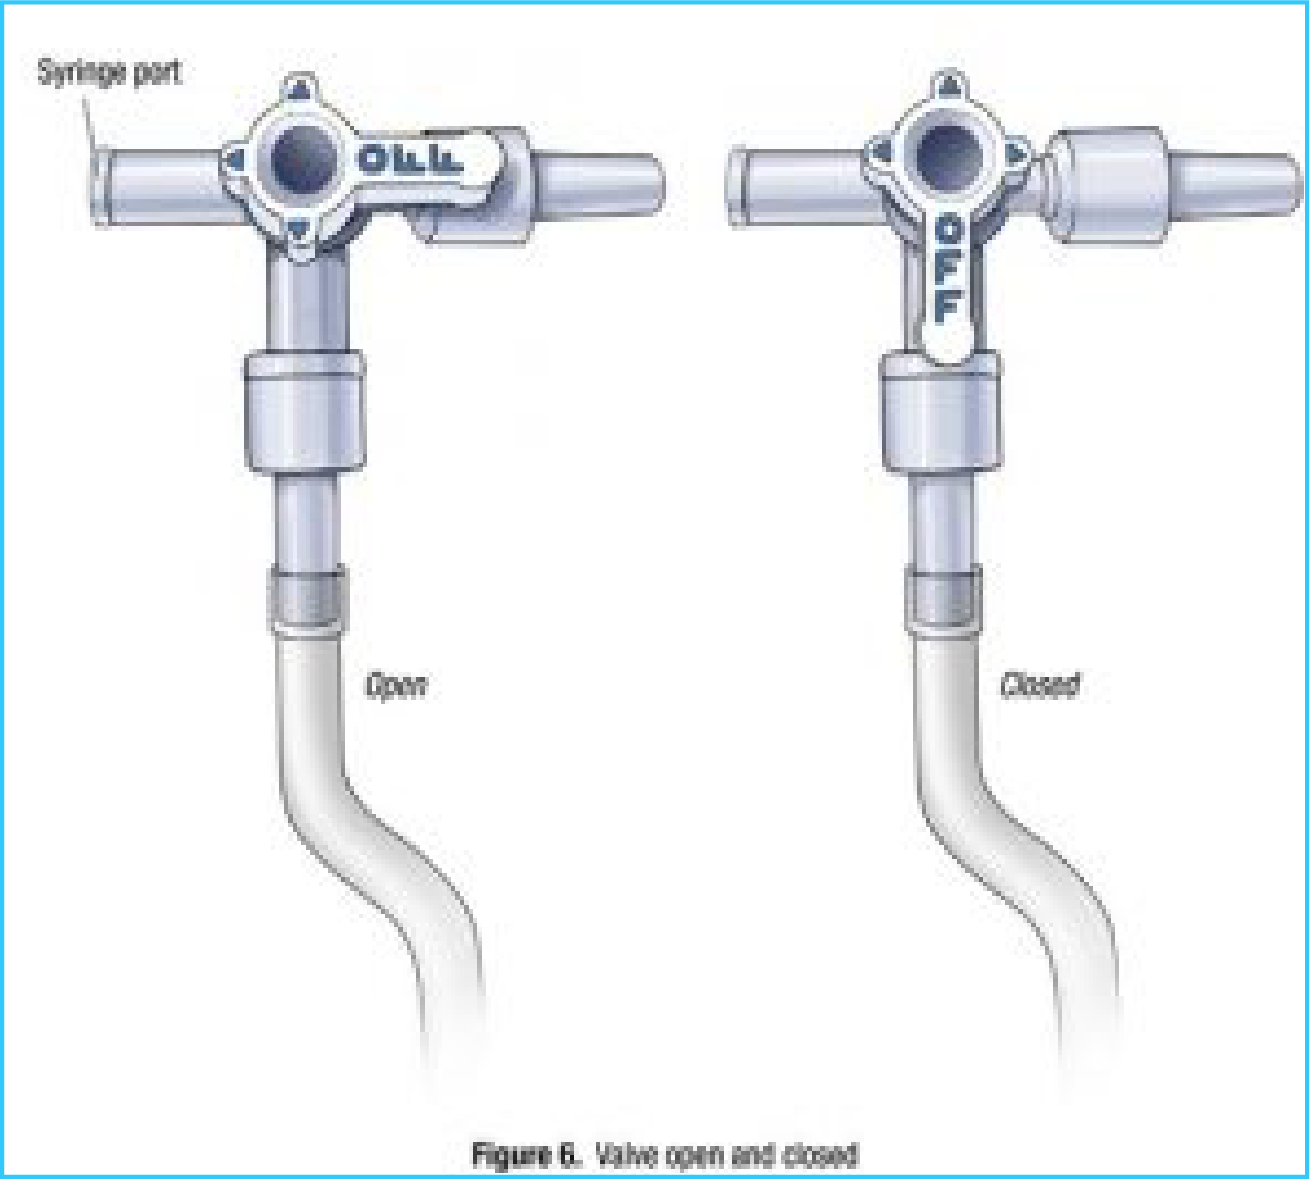
- Attach the end of the tubing to the valve if it is not already connected (Figure 6). The valve should be open so you can test the balloon by filling it with air.
- Test the balloon. Use the syringe to inflate the balloon with about 50 cc of air (Figure 7). Turn the valve to OFF so the air cannot escape (the OFF indicator will be pointed toward the balloon). Firmly squeeze the balloon. If it stays inflated, your balloon setup is ready to go. If air leaks out of the balloon, you can start over or you can wrap another layer of thread over the first one and test it again.
- Trim tails or leave longer. A long tail can be useful later if you need help removing the balloon.
- Trouble-shooting problems with balloon biofeedback Problem Possible Solutions Balloon leaks
- Continue to use if just a slow leak. This is common. If it deflates easily, replace with a new balloon setup. Balloon won’t fill
- Check to be sure valve is in the open position.
- Check to be sure there is not a “garden hose” kink in the tubing (common just below the valve).
- The balloon or tubing may be kinked in the rectum. Advance the tubing and/or pull it back until you are able to push the water in.

- Balloon inflates but water • Tape holding balloon to tubing may have won’t come out again slipped up and is blocking end of tubing. Replace with a new balloon setup. Balloon won’t pass through
- Your muscles may be too tense to allow the outlet balloon to ease through. Do not pull the balloon out if there is resistance. Allow your muscles to relax to reduce tension on the balloon and tubing. Reduce balloon volume by letting out some water. If necessary, remove all the water. Balloon and tubing separate
- DON’T PANIC. The balloon won’t harm you or while using get lost inside you.
- If part of the balloon is outside of you, grasp it and pull it out.
- If the balloon is completely inside you, it will pass with your next bowel movement.
- If you can’t bear to leave it in, you can use a Fleet™-type enema to try to flush it out.
- DO NOT STRAIN to pass the balloon.
Home Program
As you complete the Outpatient Program, your health care team will work with you to set goals for your Home Program.
Because muscle retraining takes practice and time to be effective, the Home Program is an important part of your treatment. Repetition is necessary to reinforce the muscle relaxation techniques you learned in the Outpatient Program and to retrain your pelvic floor muscles.
It often takes 6 to 12 weeks of practice to fully retrain your muscles. For some people, it can take longer. Don’t be alarmed if you have temporary setbacks with your ability to relax when first returning home.
If you have any questions or concerns about the Home Program, please discuss them with your nurse.
Relax your pelvic floor throughout the day
- Make relaxation a part of your normal routine, not just when you are using the equipment. This may mean adjusting your priorities for a period of time.
- Be mindful of keeping your abdominal and pelvic floor muscles relaxed throughout the day. Tense muscles can slow the movement of stool through your colon.
- If you find that you are tense, take the time to stop what you are doing and use the skills you have learned in the Outpatient Program to completely relax your tense muscle groups.
Use the skills you have learned when you have a bowel movement
- Wait for a strong rectal urge to have a bowel movement.
- Spend a few minutes relaxing your pelvic floor before attempting to pass stool.
- Do not strain or hold your breath. Use the relaxation techniques that worked best for you during the Outpatient Program.
My Home Program Instructions
Continue practicing biofeedback
Your nurse will work with you to create a home program plan that is right for you.
Follow the instructions below as directed by your nurse.
Goals for using the rectal sensor and hand-held monitor for biofeedback
££ As you learn to identify how it feels to relax your abdominal and pelvic floor muscles, use the sensor and monitor for about minutes times day
- Begin by setting the hand-held monitor at
- Your goal is .
££ Continue using the sensor and monitor until you feel confident that you can relax your pelvic floor muscles throughout the day. Try to keep them relaxed all day. If you feel yourself tense up, focus on relaxing your pelvic floor muscles.
After you have mastered this form of biofeedback and you can keep your pelvic floor muscles relaxed throughout the day, you can stop practicing with the rectal sensor. However, if you find that relaxing your pelvic floor muscles becomes difficult for you, return to regularly practicing this form of biofeedback until you are able to relax for most of the day.
Goals for using the balloon setup for biofeedback
££ As you learn to identify how it feels to relax your abdominal and pelvic floor muscles, use the sensor and monitor for about minutes times day
Begin by using cc of water to inflate the balloon. When it becomes easier to expel the balloon, gradually increase the amount of water as instructed by your nurse. ££ Continue using the balloon setup until you are able to expel the balloon with cc of water without pushing or straining.
After you have mastered this form of biofeedback, you may be able to have a bowel movement more easily without pushing or straining. You may be able to empty your rectum more completely. If you notice that you are beginning to strain or push, or if you are having symptoms of incomplete emptying, return to practicing with the rectal balloon equipment.
Additional instructions
Information about the Refresher Program The Refresher Program usually lasts three to five days and includes 6-10 sessions with a nurse. The Refresher Program is for those who have completed the Outpatient Program within one to two years but may need to modify their current home program.
The Refresher Program may be helpful if you ££ Have had improvement but have not met your goals.
££ Were doing well but had a recurrence of symptoms and were unable to improve using the biofeedback equipment on your own.
For more information or to find out if the Refresher Program may be right for you, start by talking to your nurse.
Contacting your health care provider
The combination of the Outpatient and Home Programs is one of the most effective treatment options for pelvic floor dysfunction. Most people do well with the Program and experience an improvement in the control and coordination of their pelvic floor muscles and improved bowel habits.
A positive attitude is important to a successful outcome, and your health care team is there to support you.